To zoom-in, pinch-out on the screen or tap "plus" icon on the bottom of the screen.
Double-tap here.(if this guide is a map edition)
As you see, by double tapping on each node you can read more its detail or edit it.
(However, edit is locked for this guide)
When single tapped, the focus of this view will be switched into the tapped node and its deeper descendants will be appeared extendedly in the pre-defined depth and enlarged.
To move a map location in a view, swipe blank area on the map.
To move a node and edit nodes relations, drag your designated node and drop it on the destination which to be parent or between siblings.
To create a new map, tap "twinkle" icon on the top of the screen.
For further information see the other topics(nodes).
TreeViews is made-in-Japan visualization tool to aim for overall optimization while people collaborate without falling into partial optimality.
The user-interfaces are optimized for doing more with less and daily use in business, study and so on which may need to grasp the relations of issues (nodes) in the dependency (importance and priority) easily than other typical map based applications.
These are very classical method in the critical thinking( or logical thinking) in business administration but have NOT been recognized or used effectively beacuse it is too much hastle to utilize them in daily management with PAPER.
But now that we can use COMPUTERS for it !
At last they have become common tool by TreeViews and the similar sort of applications that enable people to edit and share and view them easily!!
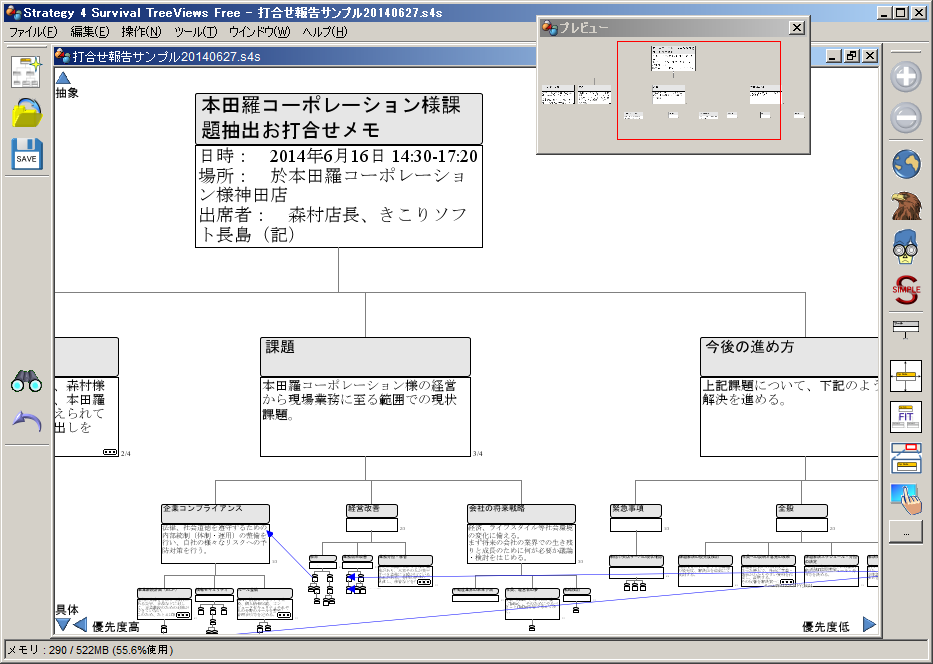
can describe chains(paths) of purpose and means relations from high strategic layer to low tactical layer.
Y-axis: Importance, X-axis: Priority(in comparable issues = in same layer)
-Task Management function on node
-Done or yet
-Start/Due date
-Person in charge
-Progress level bar
-Memo
etc.
[Person In Charge] George.W @ HQ
[Due Date] 5 25, 2019
can describe chains(paths) of cause and effect relations.
can describe chains(paths) of "effect and cause" relations from high abstract layer to low concrete layer.
It's suitable for analyzing how fundamental effect consist of various issues(elements as cause) .
Y-axis: Fundamentality , X-axis: Priority(in comparable issues = in same layer)
can describe chains(paths) of cause and effect relations from high abstract layer to low concrete layer.
It's suitable for analyzing what kind of issues(elements) derive from fundamental cause.
Y-axis: Fundamentality , X-axis: Priority(in comparable issues = in same layer)
Y-axis: Fundamentality , X-axis: Priority(in comparable issues = in same layer)
can describe chains(paths) of composition ("has-a") relations from high abstract layer to low concrete layer.
It's suitable for organizing and managing various information and documents(structures).
Y-axis: Granularity , X-axis: Priority(in comparable issues = in same layer)
TreeViews is not so much a tool targeted at individual ad-hoc work as a tool for continuous collaboration.
This is the main concept.
It is different from other map applications in this category.
TreeViews makes your communication more faster, easier and accurate by its features to clarify and simplify complex/complicated dependency of issues.
TreeViews has unique views each view has different scope(depth from selected node to its descendants) and they can be switchable by one-click.
In combination with focus feature into the selected node, user can concentrate on the necessary and sufficient information only.
This view mode is suitable for grasping how much the information in the map is and how it relates.
Specifically, it is suitable for organizing a huge number of items by individuals.
This view mode displays the amount of information of moderate depth for the selected branch for the information in the map.
Specifically, it is suitable for collaborative work between people who understand the information in the map to some extent.
This view mode displays the information in the map to the minimum necessary.
Specifically, it is suitable for presenting complicated things to people who do not know about the contents of the map.
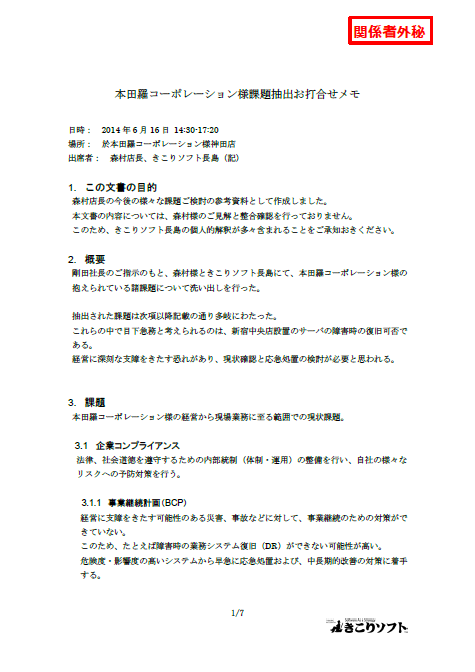
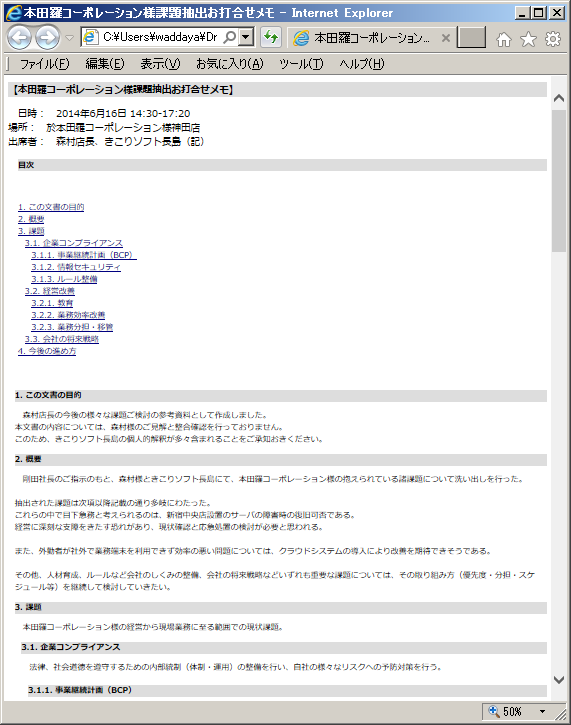
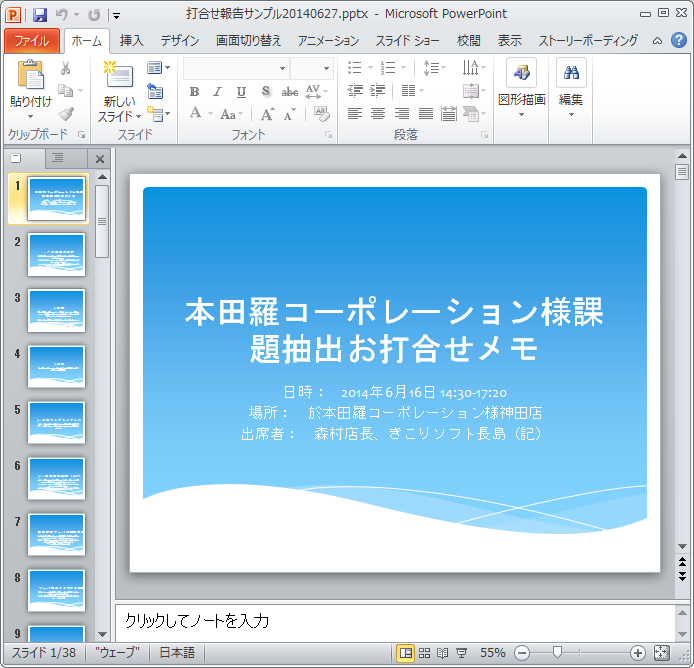
TreeViews can generate various type of document from the map as an outliner.
Simply, title of the node becomes the section title and body becomes section body in plain-text, Microsoft Word/PowerPoint format.
Closed(hided its descendants) node isn't outputted and not counted as a section so you can generate a document in the granularity you want(e.g. summary for the executives, detail for your men) from one-source map!
TreeViews can drill-up from initial root node by inserting new parent node to be new root.
By linking external map file(s) as virtual to your map, you can get just-in-time merged view as if it is huge single map file.
It(How-Tree) enables you and your men(or the other members) to share the work or burden visually and they also can manage(edit) their issues in his/her own scope(=each map file) and grasp whole issues and their relations in overall scope(on the VMM) at the same time!!
Virtual-Map is easy to create from detaching the portion from the original overall-map by clicking the "detach" icon in the node edit menu box.
Or opposite way(by linking from each external map to one map) is also available.
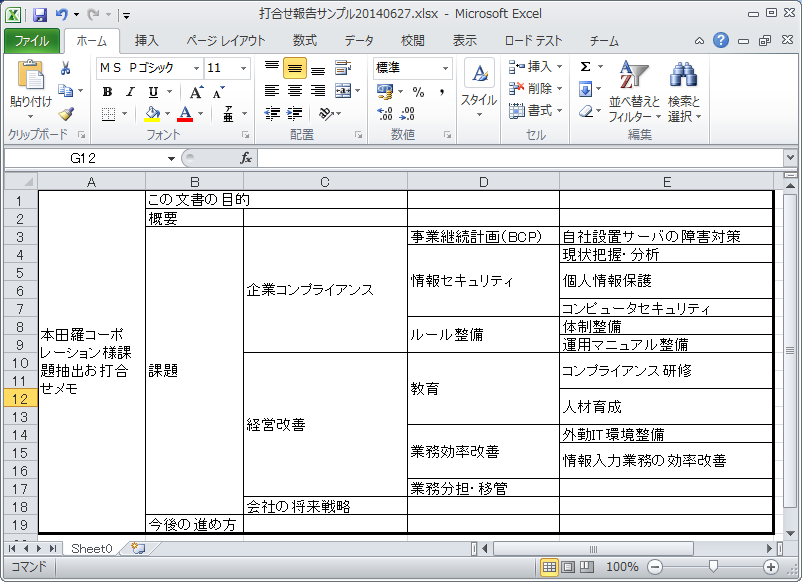
TreeViews can create plain Gantt chart in MS-Excel format from WBS(Work Breakdown Structure) tree.
[参照]→ 「2)-2. Create/maintain WBS(Work Breakdown Structure)」(toward "Create WBS(Work Breakdown Structure)")
Easy to import or link other map (not only TreeViews(.tvm) file also FreeMind(.mm)!)
New features
- Updated manual
- When the map is modified, add "*" to the end of the map file name.
Currently, there are no issues.
Please let us know if you have any problems with GooglePlay's evaluation comment or the following e-mail address.
* If you are using the free edition, please understand that we may not be able to reply depending on the congestion situation of the information desk.
Thinking Woodman Software (KikoriSoft) information desk:
thinkingwoodman@gmail.com
To move a map location in a view, swipe blank area on the map toward the direction you want it to move.
![]()
To zoom-in, pinch-out on the screen or tap "plus" icon on the bottom of the screen.
![]()
To zoom-out, pinch-in on the screen or tap "minus" icon on the bottom of the screen.
![]()
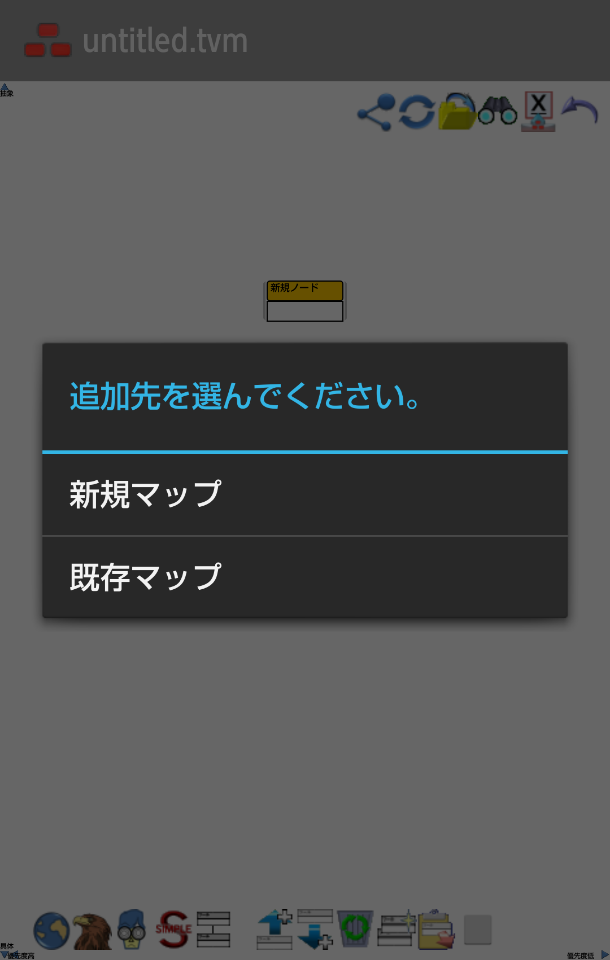
To create a new map, tap "twinkle" icon on the top of the screen.
At this time the map-view showed before create new one will be kept and resume when you close the current map-view by double tapping on the "back" button on this phone.
![]()
Tap "cyclic" icon on the top of the screen.
If it is first time for the map you can save map as new name you want.
If not, TreeViews will only ask if you want to overwrite or not.
To rename or remove map file use any file manager.
![]()
Tap the "folder" icon on the top of the screen and select the map file you want.
This way is suitable to open the file recently opened or saved by TreeViews.
If the map file was newly created or might have been modified on another terminal and depends on file-sync-system(e.g. Dropbox) we recommend you to open the file via that application for your convinience and to avoid the sync failure.
We recommend you to open the map on shared folder (synchronized with other terminals) with the application it depends for your convinience and to get rid of the sync failure.
![]()
Select node and tap the "sharing" icon on the top of the screen and you can send the portion of the map(selected node and its descendants) as a file to selected application (e.g. mailer).
![]()
You can back from current selected node to its parent by tapping once the "up-arrow" icon on the bottom of the screen.
You can select and focus the target node with a single tap.
When selected, the node is expanded to a certain size.
Also, depending on the display mode of the view, if the lower branch follows, it will be displayed up to the specified depth (view-range from the selected node).
Drag the node and release your finger on the node you want it to be the parent (drop).
Likewise, if you drop it in any gap between siblings, you can insert it.
If you want to move to the left or right edge of a sibling, drop it on the side you want to insert somewhat rather than in the middle of the current endmost node.
(As the guide is displayed at the upper left of the screen while dragging the node, please refer to it as well.)
Double tap the target node.
A dialog for confirming the link destination and selecting the operation is displayed, so select "Open".
![]()
If you touch the pencil button at the bottom of the screen or the pencil icon displayed at the lower right of the node immediately after selecting the node, the node editing menu bar will be displayed above it.
The node editing menu bar disappears after a certain period of time or when you tap the pencil button at the bottom of the screen again.
![]()
By tapping the stopwatch icon on the node edit menu bar, you can view and edit the task information of the selected or last selected node.
By using this function together, you can manage the details of each team and organization's tasks while looking at the map on the map.
It can also be applied to WBS creation. It helps when creating a work list or a line chart in cooperation with the PC version.

Task information, the progress bar on top of the node box (%), done or attention, hold mark, it appears deadline and in charge at the bottom.
*this example of display is in Japanese version
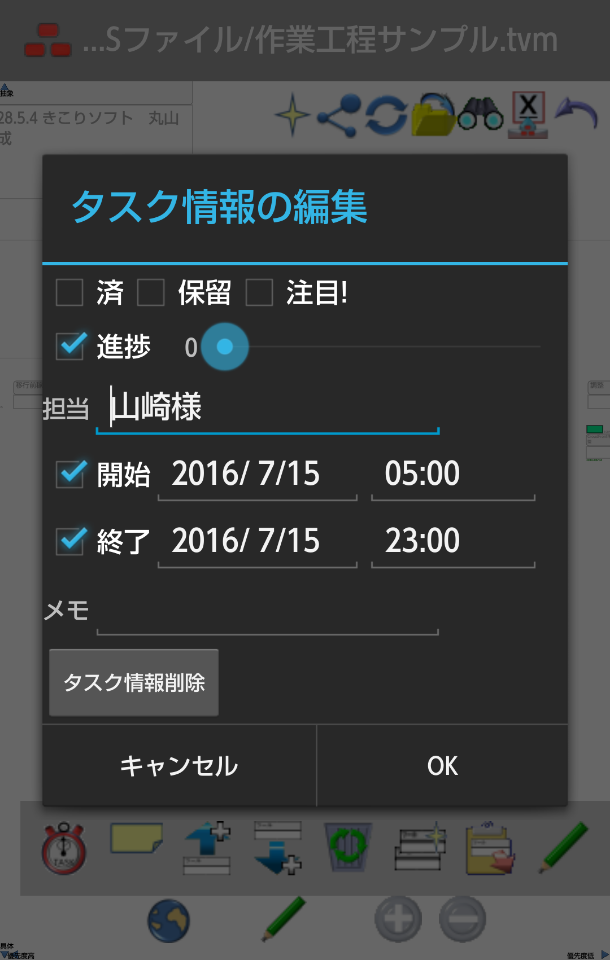
In the browsing / editing task information dialog, you can also set start times and notes that are not displayed on the map.
*this example of display is in Japanese version
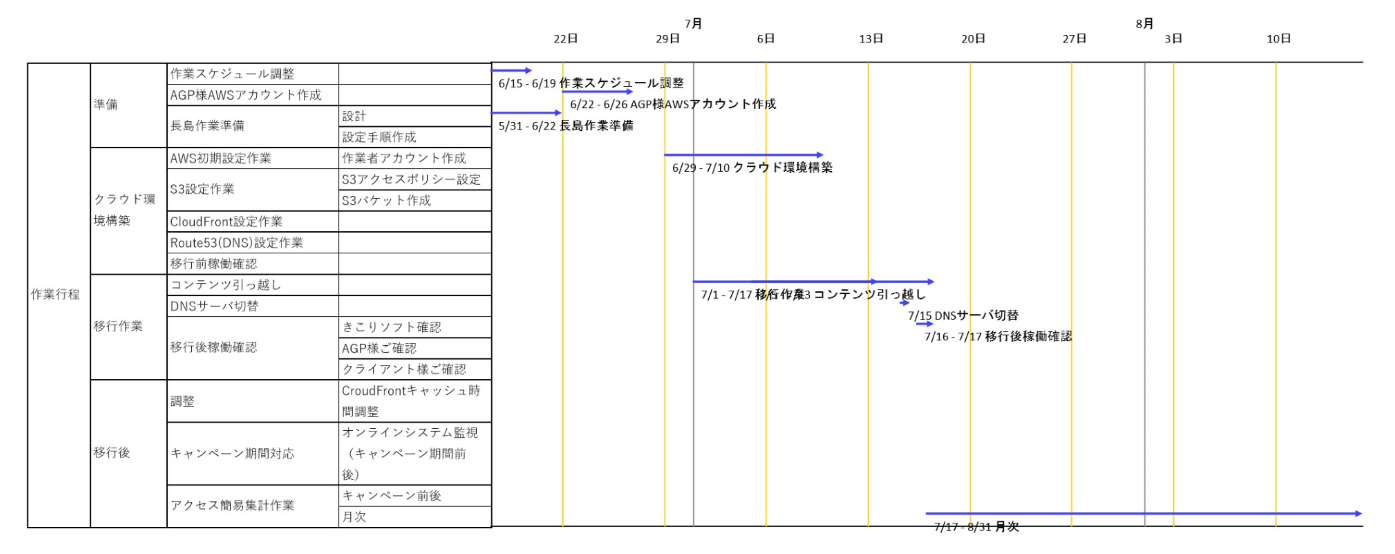
On the PC paid version, you can display the schedule (time line chart) of the map containing the task information.
You can also export the schedule to an Excel file along with the WBS table.
This function is available during the trial period, so please try it!
*this example of display is in Japanese version
![]()
The sticky note branch function is useful when you want to add information such as memos to the node without displaying it normally.
Tap the sticky note icon on the node edit menu bar to add a sticky note branch to the selected or last selected node.
A node with a sticky note branch has a small sticky note icon at the bottom right of the node.
By tapping the +/- mark on this small icon to switch it, you can toggle display and non-display of descendants from sticky note node.
You can add ordinary nodes freely below this branch.
The opening / closing state of the sticky note branch is retained when the map is saved.
You can hang ordinary branches.
![]()
You can insert a new parent node between the selected node and the parent node.
To insert it, tap the up arrow icon in the node edit menu bar.
![]()
You can add a new child node to the currently selected node.
To do so, tap the down arrow icon in the node edit menu bar.
![]()
You can delete the node under selection.
Tap the trash-can icon in the node edit menu bar.
![]()
Copy the selected node and its descendants (branch).
Tap the copy icon on the node edit menu bar to copy.
![]()
Paste the previously copied branch to the currently selected node.
To paste, tap the clipboard icon on the node edit menu bar.
![]()
Edit the selected node or display the details of the body.
Tap the pencil icon on the node edit menu bar to edit or browse the details.
You can also manually set a link to a local file or URL.
For link to URL, there is a method of easily linking from the browser or clipboard (see the application section).
When linking to a local file, please describe the relative path from this map file.
The link to the URL must start with "http: //" or "https: //".
[参照]→ 「3.1.2.1. How to bookmark (link)」(to How to bookmark (link))
When you long-tap the node of interest, you can edit the various node properties such as color.
![]()
Like the PC version, you can set the text, box fill, line color etc
![]()
Like the PC version, markers ("done" and "attention!") can be set to nodes.
In addition to the parent-child relationship of the node, you can make a link by a reference arrow between arbitrary nodes.
Press and hold at the node where you want to start the link, select "Arrow link start point"
Similarly, if you select 'Arrow link end point' on the node to be terminated, the arrow link will be tied.
Long press on the arrow link line, you can change the color of the link, edit the label string, etc.
You can delete only the node in the selection, leaving the offspring.
However, if the target is a child of the root node, you can thin out only if it is only one child.
![]()
You can return editing state for editing operation.
(Maximum number of times to undo : Free=2 , Pro=100)
Tap once to restore to the previous edit state for one operation.
![]()
By using view switching, you can change the display range of the node selected according to the purpose, such as viewing the whole or editing it in part, to a suitable depth.
Tap the globe button at the bottom of the screen and the view setting menu bar will be displayed above it.
Tap the globe button again or tap the map to hide the menu bar.
![]()
Tap the globe icon on the view setting bar to switch to the full display mode.
Display all nodes as much as possible.
It is suitable for when you want to grasp the whole in a personal work.
However, in the case of a huge map, the smartphone is subject to a load of drawing processing as appropriate, so the reaction of scaling may be extremely low.
In this case, you can comfortably display by switching to other bird's eye or myopic eye mode (described later).
![]()
Tap the bird icon on the view setting bar to switch to bird's-eye view mode.
You can toggle the bird's eye view (large) and the bird's eye view (small) by tapping the same icon continuously, and you can fine-tune the display range.
This view displays nodes to a certain degree of depth (view) from the selected node.
It is suitable when discussing within a group that already knows the whole map.
![]()
Tap the eyeglass man's icon on the view setting bar to switch to myopic view mode.
The range is narrowed down from the selected node to the node immediately below it.
It is suitable for presentations, such as when explaining step by step to those who do not yet understand the contents and intentions of the map.
![]()
Tap the S mark icon on the view setting bar to switch between simple display mode and standard mode.
In the simple display mode, the text of the node is not displayed.
Regardless of details, make it easier to capture the structure of the issues without giving extra information, such as when viewing overlooking or explaining to others.
![]()
By tapping the icon that looks two-nodes connected up and down on the view setting bar , you can change the magnitude (perspective) depending on the depth of the node.
Every time you tap, it will switch to equal size (no perspective), perspective (strong), far perspective (weak).
![]()
The selected node can be centered on the screen.
This is useful when you lose sight of the selected node or the map itself while moving the map.
![]()
Search the title of the node or the contents of the body by keyword and display the result as a list.
By tapping the displayed item you can jump to that node and focus.
Tap the binoculars icon at the top of the screen and a search dialog will be displayed.
Keywords can be searched as an AND condition by separating them with a space.
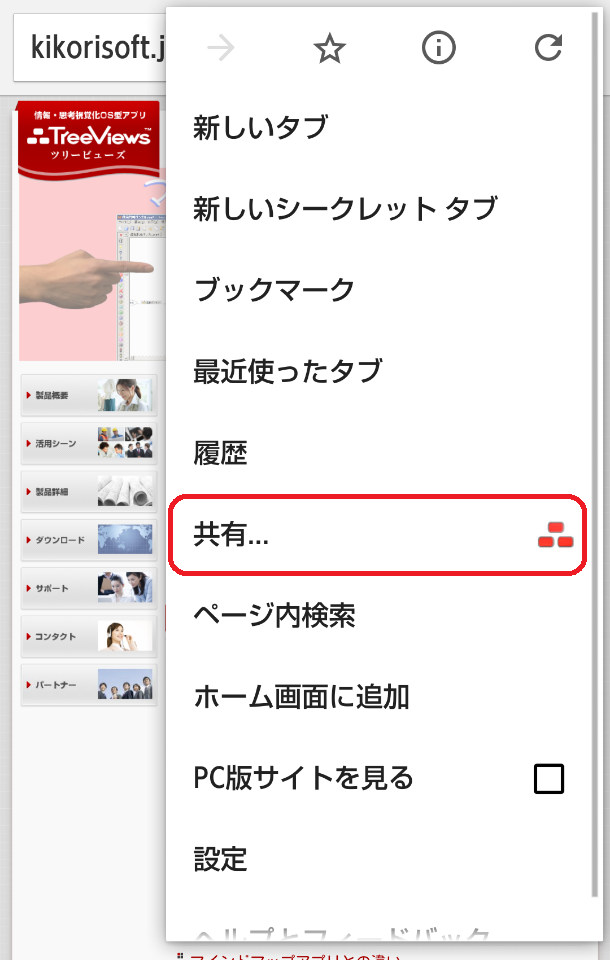
This section explains easier way for bookmark URL other than the manual link described in the fundamental section on node editing.
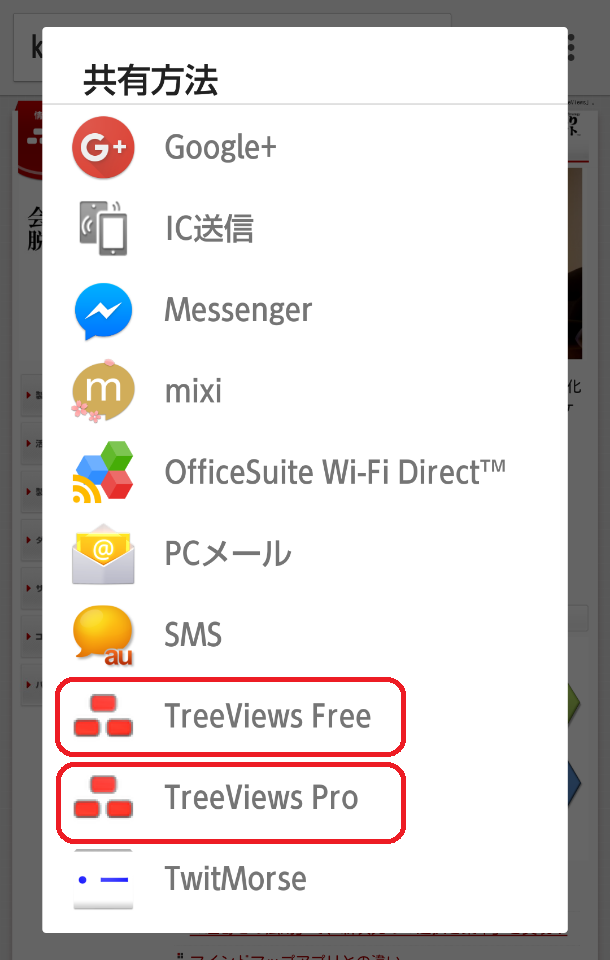
Many apps have "share" (or "send", "export") menus for pages and URLs.
If you select TreeViews as the destination from this menu, you can create a link node with the paste button to an existing or new map.
![]()
If you copied the URL from another application to the clipboard, you can easily create a link on the map.
Select the parent node you want to hang up the link node and then tap the clipboard icon on the edit menu bar to paste the contents of the clipboard.
At this time, if the content begins with "http: //" or "https: //", the link node is automatically created instead of the normal text paste.
Also, the title of the page indicated by the URL is also automatically acquired via the net and set as the subject of the node.
![]()
Convert map created by TreeViews to other data format.
You can also email the conversion result immediately or save it to a shared folder such as Dropbox.
Select the branch you want to convert (selecting the root node will target the whole map) and then tap the icon out of the TreeViews mark at the top of the screen to display the export format selection dialog.
![]()
Convert the displayed map to text with chapter prominence / simplified prohibition using the built-in text template and output it.
You can take a minutes note on the map, convert it to the minutes of the text instantly, attach it to e-mail etc and send it.
![]()
Export as mind map application FreeMind mm format file.
Reference arrow link, node color information, node name, node body text ( "note" in FreeMind), order between siblings are preserved.
TreeViews Unique attributes (such as task information) with the contents of the original tvm format will be lost.
When you work with PC paid version, it allows you to export to a variety of file formats.
Please try it!
![]()
![]()
![]()
![]()
../../samples/schedule_sample.tvm
Currently in Japanese.
Translation in progress.
../../samples/company_strategy.tvm
Currently in Japanese.
Translation in progress.
Coming Soon!
A. The Android version of Dropbox are not synchronized as strictly as PC version.
For this reason, except for the case of sending map via TreeViews's "send" function, the modification of locally saved map will not be reflected in a synchronized folder in the map save function of TreeViews.
In addition, updating conflicts may occur in map files that may be frequently updated from other terminals, and consistency may be lost.
To avoid these problems, do not open shared map files from TreeViews directly. Always open them from Dropbox applications and edit / overwrite them.
(If you create a new map and want to add a new file name when updating and saving, please do not use the TreeViews saving function and send it to the file sharing application with the sharing function)
[参照]→ 「(5) Open/Load Map」(toward "Open/Load Map")
A. It is a limitation of Android version of GoogleDrive and OneDrive.
Although you can upload files from external applications, there is no overwrite update function.
In the case of OneDrive, when the same name file exists in the upload destination folder, it is automatically saved with a name that does not conflict by adding a number at the end of the file name.
A. We're sorry, we are currently in intensive create the article in the utilization method by type of way and the tree of logical thinking. Please wait for a while as we will publish it on a web site etc. as soon as preparation is completed.
For those who can not wait, please read books on logical thinking including keywords such as "Issue Tree" and "Pyramid Structure".
We think that you can see that logical thinking that practicality was suspicious from a time-consuming method such as traditional paper-based mind map etc. can be dramatically and easily used by TreeViews on a daily basis.
A. External file is usually linked with a path which relative to the map file.
The file entity is not included in the map.
Because only the map body is transmitted by the sharing function, the links etc. will be broken.
If the relationship of relative path is maintained, you can send it keeping its contents to other folders and terminals by moving / compressing each folder (using another file management application etc.).
A. The entity of the file is not included in the map.
For this reason, even if you link images displayed in the browser, if the browser's cache is cleared or the terminal is restarted, the entity will be gone, so it will not be displayed.
For files of this nature, move it to a folder that is not erased before linking.
A. It does not correspond. Unlike existing mind maps and other applications, TreeViews is designed to be a vertical tree on purpose.
It makes sense to arrange the vertical and horizontal axes so that you can logically analyze and organize things.
Also, free placement is less likely to convey its meaning to other people when explaining things with maps, which leads to confusion of readers and makes it cheaper.
A. Batch change of node title and body color is supported, but it does not correspond to character unit qualification.
That is because heavy use of character decorations may destroy the logical structure of the tree.
Although it is trying to illustrate relationships and importance in the structure, it is not a good idea to bring in another structure inside the node.
Instead of decorating it, we recommend that the node be further structured and expressed.
This is the same reason why TreeViews can not arrange nodes freely.
A. The icon attached to the node is only the "done" mark, the "attention" mark, and the task management related icon.
This is because the heavy use of icons is hard to convey its meaning, and it hinders the sharing of maps and joint use with others.
This is the same reason why TreeViews can not arrange nodes freely.
== Difference from Free version
First, there is no advertisement display.
In addition, you can use the following useful functions!
- FreeMind map import / export function
- Keyword search, jump display function to the relevant node from the result
- Unlimited Undo function (Max number of times : 100)
- Task management function (Line table can be displayed when linked to PC version, its excel output is possible)
- Sticky note branch creation function (If you do not need it, you can fold the display)
https://play.google.com/store/apps/details?id=jp.kikorisoft.android.treeviews.pro
Currently, it is Japanese only.
We plan to renewal the site along with internationalization of PC version of this product within 2016.
http://kikorisoft.jp/products/s4s/treeviews/
../EULA_en.txt
This is the license agreement you agreed upon during installation or update.
You can see the contents by double tap.
This software is built by third party software.
I would like to express my sincere appreciation to all vendors and individuals who provided these software.
I also deeply appreciate the cooperation of my families, friends, former colleagues, customers, friends and acquaintances on the Internet, who gave me opinions and encouragement in developing this software.
Especially with great deep gratitude and love to my mother who died in January 2016 and my father who died in August, giving me much love and happiness and wisdom.
Thinking Woodman Software (JP: KikoriSoft) representative: Kenichi Nagashima
All trademarks mentioned are properties of their respective owners.
This software is built with Oracle's Java technology and runs in Java execution environment.
We appreciate all companies, organizations and individuals who have developed, disseminated and developed Java, including Sun Microsystems, IBM, and others.
Acknowledgement:
This softoware was developed with "Eclipse Java EE IDE for Web Developers".
I am deeply grateful to Eclipse contributors and others.
http://www.eclipse.org/
Acknowledgement:
The Windows Edition executable of this softoware was wrapped with Launch4j (developed by Grzegorz Kowal).
I am deeply grateful to Grzegorz Kowal.
http://launch4j.sourceforge.net
Acknowledgement:
This softoware was developed with "Apache POI - the Java API for Microsoft Documents".
I am deeply grateful to Apache contributors and others.
http://poi.apache.org/
Acknowledgement:
This softoware was developed with "Apache Batik".
I am deeply grateful to Apache contributors and others.
http://xmlgraphics.apache.org/batik/