Click to enlarge.
To read the full sentence, hover over "..." in the lower right corner of this node (if this manual is a map version)
Each node (item) other than the link can be edited by double-clicking over the title or by push Enter key.
Also, when single clicking, focus will shift to each node (item), and its related descendant branches will be automatically closed up.
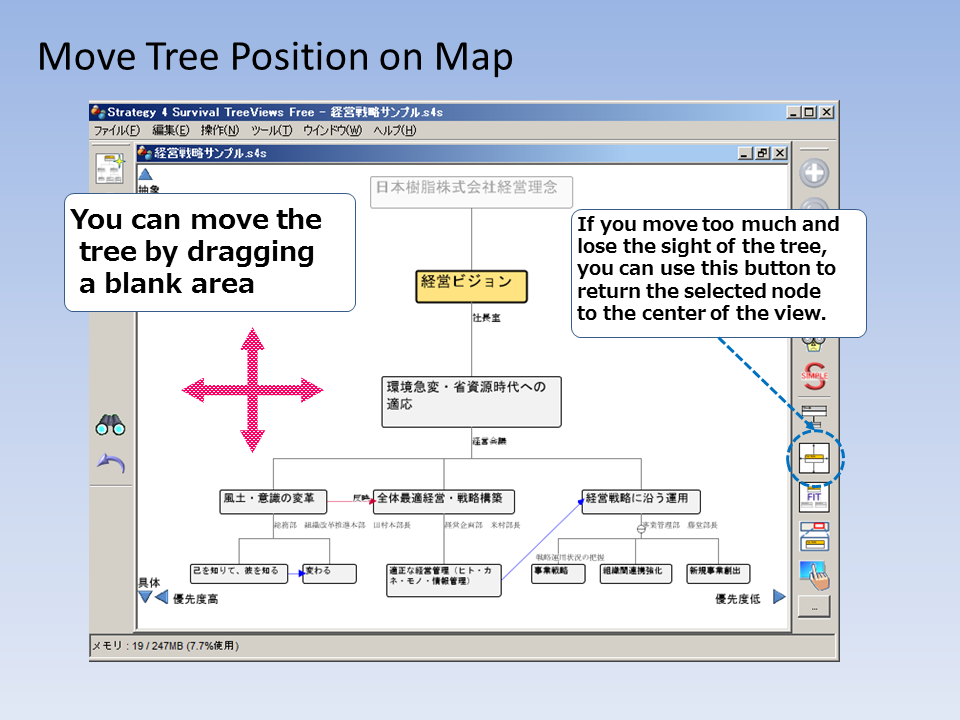
To move the display position of the map itself, drag a blank area that is not a node.
Move or edit a node by moving (dragging) while holding a node, releasing it at the node you want to be a parent, or leaving (dropping) it between the siblings where you want to insert.
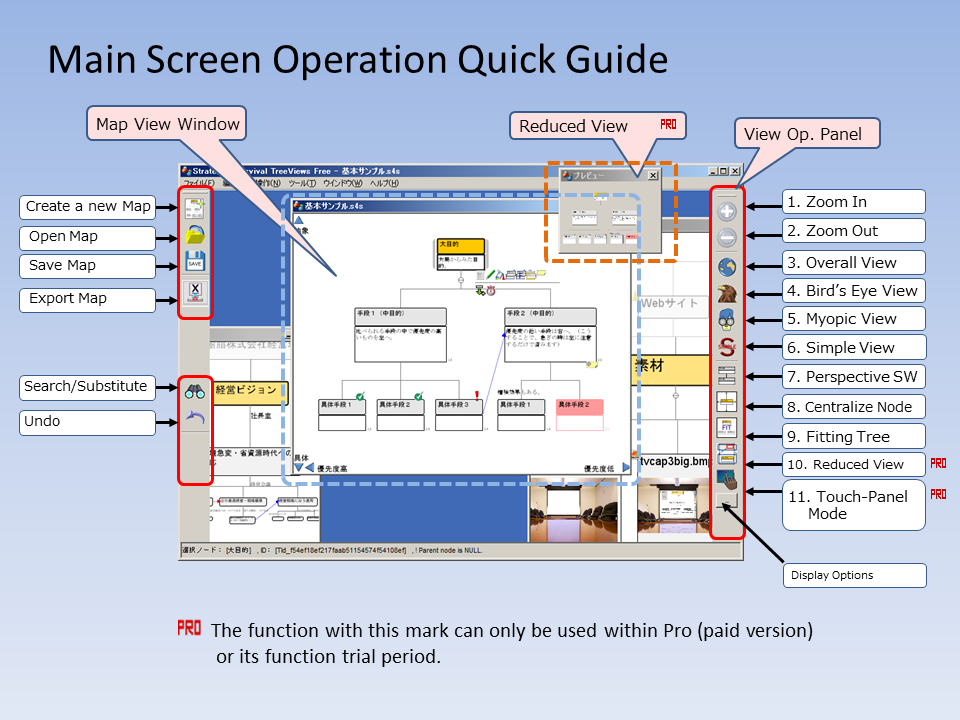
To create a new map, click the "twinkle" icon on the upper left of the screen.
For details, please see the following.
ver. 1.1en
TreeViews is a tool for easily organizing and handling complex / complicated relationship information everyday.
Its main features are the adjustment / focus function of the amount of visual information, the arrangement function on the X and Y axes for expressing the priority and abstraction level of items.
And its tree-view can not only drill-down but also DRILL-UP, so it enables expanding your horizons, preventing missing reviews, and assisting creative inspiration.
TreeViews supports multiple platforms. (Windows, MacOSX (Under construction), Android)
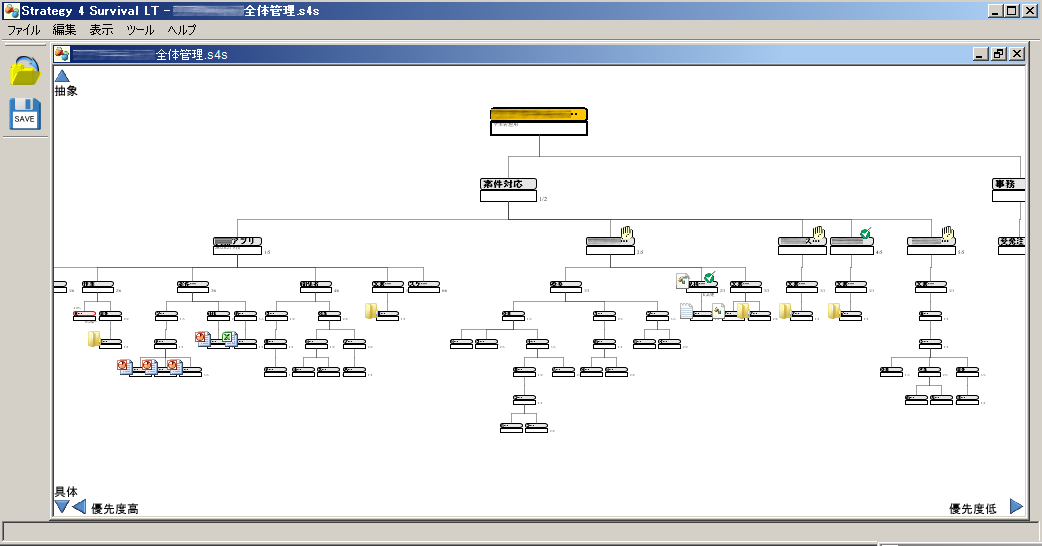
You can manage all the information such as strategy, task, bookmark, memo, link to document, in a branched manner.
First of all, you can hang the element roughly, then you can move and organize the element by dragging and dropping whenever you like.
Also as an outline processor you can convert from maps to create easy-to see chapter-oriented text, HTML, Word documents and Excel tables (MS Office documents are available for paid Pro version only).
- Drag and drop makes it easy to rearrange nodes and change relations
- View (scope & focus) switching function makes meeting, group work, personal work all easy to see
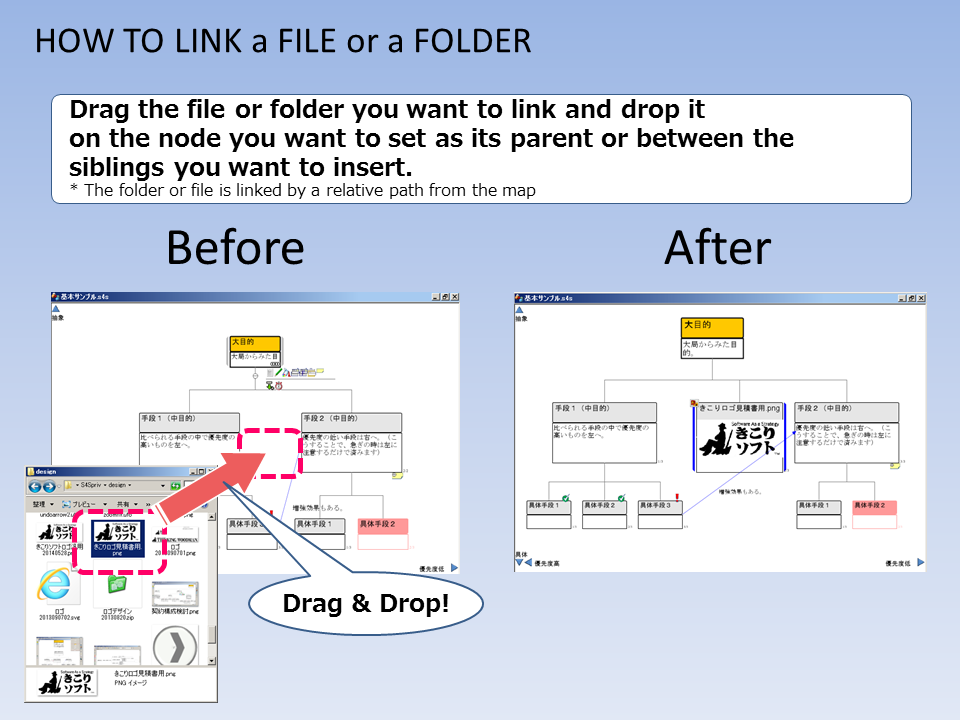
- Drag and drop makes it easy to bookmark, link files
- The subject and body / only the subject can be switched
- Easy to touch items even on narrow screens, no need to open/close branches
- In addition to parent-child relationships, you can create many-to-many labeled arrow link (FreeMind compatible)
- Can overlook a vast mind map without difficulty
- Automatic layout reduces editing work and maintains a logical arrangement easy to communicate to others
- Easy creation and transmission of minutes with sectioned document generation function
- Supports FreeMind format import / export *1
- Thumbnail display of linked images (JPEG / PNG etc)
- Exporting maps in PNG / SVG image format
- CSV file import (also supports task information)
- Outline processor function (Text, HTML output in Free version)
*1 There is no compatibility of arrangement / attribute meta information other than basic node information such as title and note.
- Virtual map (Multiple maps can be displayed with one virtual map)
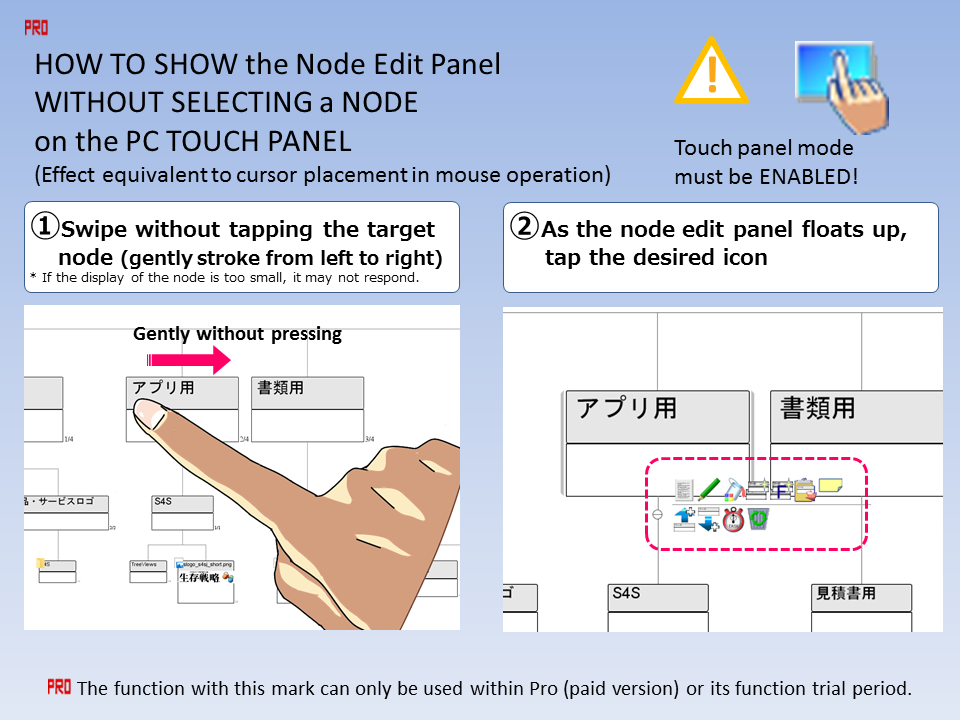
- Comfortable operation in touch panel mode
- Export to Office document
- Task management function (It is possible to create WBS line chart from map to MS Excel)
- Sticky note function that can be hidden as necessary
- Folder / file update monitoring, automatic reflection function
- Map shrink preview window
- Review of management, planning, composition of organization
- Visualization and management of relationships between strategy, practice, projects, etc.
- Various designs such as system design and requirement definition
- Creation of WBS (for paid version only)
- Outline review of reports, procedures, and papers
- Configuration management of documents, laws, rules, etc.
- Mapping and organizing survey and collected information
- Share bookmarks, memos between PC/smart phone or members
- Management of worldview of creative works etc.
- Learning of logical (critical) thinking, education
- Material management of CG, photographs etc.
If this guide is in map format, double click on the node that you want to see.
Explanation image will be displayed.
TreeViews is not so much a tool targeted at individual ad-hoc work as a tool for continuous collaboration.
This is the main concept.
It is different from other map applications in this category.
TreeViews makes your communication more faster, easier and accurate by its features to clarify and simplify complex/complicated dependency of issues.
TreeViews has unique views each view has different scope(depth from selected node to its descendants) and they can be switchable by one-click.
In combination with focus feature into the selected node, user can concentrate on the necessary and sufficient information only.
This view mode is suitable for grasping how much the information in the map is and how it relates.
Specifically, it is suitable for organizing a huge number of items by individuals.
This view mode displays the amount of information of moderate depth for the selected branch for the information in the map.
Specifically, it is suitable for collaborative work between people who understand the information in the map to some extent.
This view mode displays the information in the map to the minimum necessary.
Specifically, it is suitable for presenting complicated things to people who do not know about the contents of the map.
TreeViews can generate various type of document from the map as an outliner.
Simply, title of the node becomes the section title and body becomes section body in plain-text, Microsoft Word/PowerPoint format.
Closed(hided its descendants) node isn't outputted and not counted as a section so you can generate a document in the granularity you want(e.g. summary for your boss, detail for your team menber) from one-source map!
TreeViews can drill-up from initial root node by inserting new parent node to be new root.
By linking external map file(s) as virtual to your map, you can get just-in-time merged view as if it is huge single map file.
It(How-Tree) enables you and your men(or the other members) to share the work or burden visually and they also can manage(edit) their issues in his/her own scope(=each map file) and grasp whole issues and their relations in overall scope(on the VMM) at the same time!!
Virtual-Map is easy to create from detaching the portion from the original overall-map by clicking the "detach" icon in the node edit menu box.
Or opposite way(by linking from each external map to one map) is also available.
TreeViews can create plain Gantt chart in MS-Excel format from WBS(Work Breakdown Structure) tree.
Easy to import or link other map (not only TreeViews(.tvm) file also FreeMind(.mm)!)
Click to enlarge.
Click to enlarge.
Click to enlarge.
Click to enlarge.
Click to enlarge.
Click to enlarge.
Click to enlarge.
This section explains how to use TreeViews in more detail for the Quick Guide.
To move a map location in a view, swipe blank area on the map toward the direction you want it to move.
Click to enlarge.
![]()
you can magnify the map with the plus button in the upper right of the screen or with turning the mouse wheel forward.
In touch panel mode you can also zoom in with pinch out with your fingertips.
![]()
You can reduce the map with the minus button on the upper right of the screen or with turning the mouse wheel toward you.
In touch panel mode, it can be reduced even with pinch-in by the fingertip.
![]()
Click the twinkle icon on the top left of the screen then a new map with a new window will be created.
![]()
Click the SAVE icon in the upper left of the screen to show the save dialog.
When sharing a map with PC version and Android version, there are the following restrictions.
In the specification of Android version of these file sharing services, it is not possible to overwrite and update the map from Android side.
It is necessary to save a new name with an alias.
Although Dropbox has cautions on synchronization, it is possible to overwrite and update each other.
![]()
Clicking on the folder open icon in the upper left part of the screen opens a file selection dialog so select the map.
You can open the file by selecting "File" → "Recent Files" in the application menu.
To delete the history, please select "delete history" at the end of the history.
Drag the map file from the Explorer etc. and drop it on a blue background part other than TreeViews map view window.
[Ref]-> [(2) Restrictions on sharing on Onedrive / Google Drive for Android]
![]()
In the VMM function, by linking another external map as a virtual map, it is possible to automatically synthesize an external map when opening a link source map as if it is a single huge map.
Actually, the first "Introduction" section of the map version of this guide is virtualized and partly merged the external map README.tvm.
(The original external map can be opened with "Open entity" in the context menu displayed by right-clicking on the node in the section)
This makes it possible, for example, to visually share and divide-govern the work of you and your subordinates (or project members).
While independently editing and managing the map information of each responsible area, at the same time it becomes possible to grasp the mutual work situation and the whole relationship integrated by VMM!
a VMM can be created on the node of the part to be separated / virtualized from the whole map by clicking on the "detach" icon of the edit panel.
Alternatively, you can create it by virtual linking by dragging another existing map onto the master map you want to be a VMM.
You can select and focus the target node with a single click.
When selected, the node is expanded to a certain size.
Also, depending on the display mode of the view, if the lower branch follows, it will be displayed up to the specified depth (view-range from the selected node).
Drag the node and release your finger on the node you want it to be the parent (drop).
Likewise, if you drop it in any gap between siblings, you can insert it.
If you want to move to the left or right edge of a sibling, drop it on the side you want to insert somewhat rather than in the middle of the current endmost node.
(As the guide is displayed at the upper left of the screen while dragging the node, please refer to it as well.)
![]()
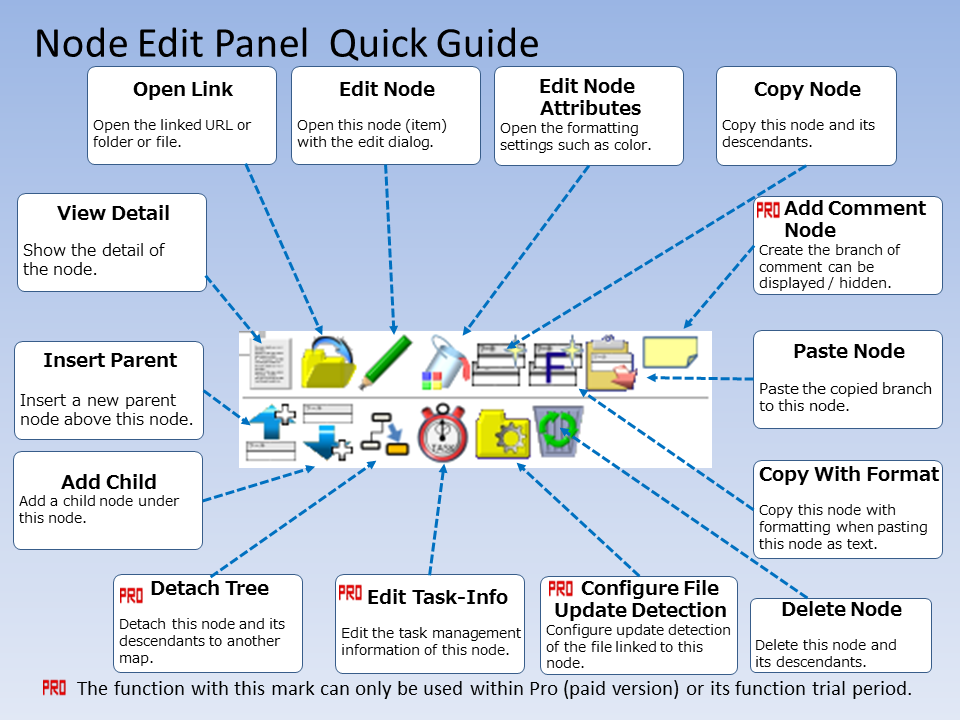
You can open a link node of a file link or bookmark with double click.
You can also open it by clicking the folder icon in the node edit panel.
Unlike normal nodes, press the return key to edit or click the pencil icon in the node edit panel.
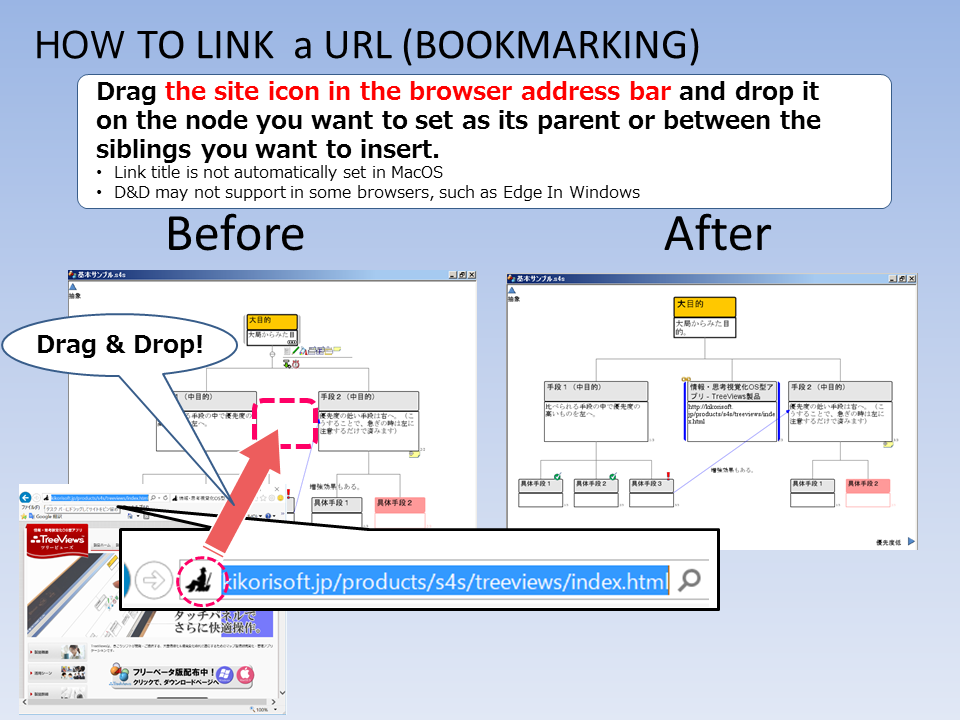
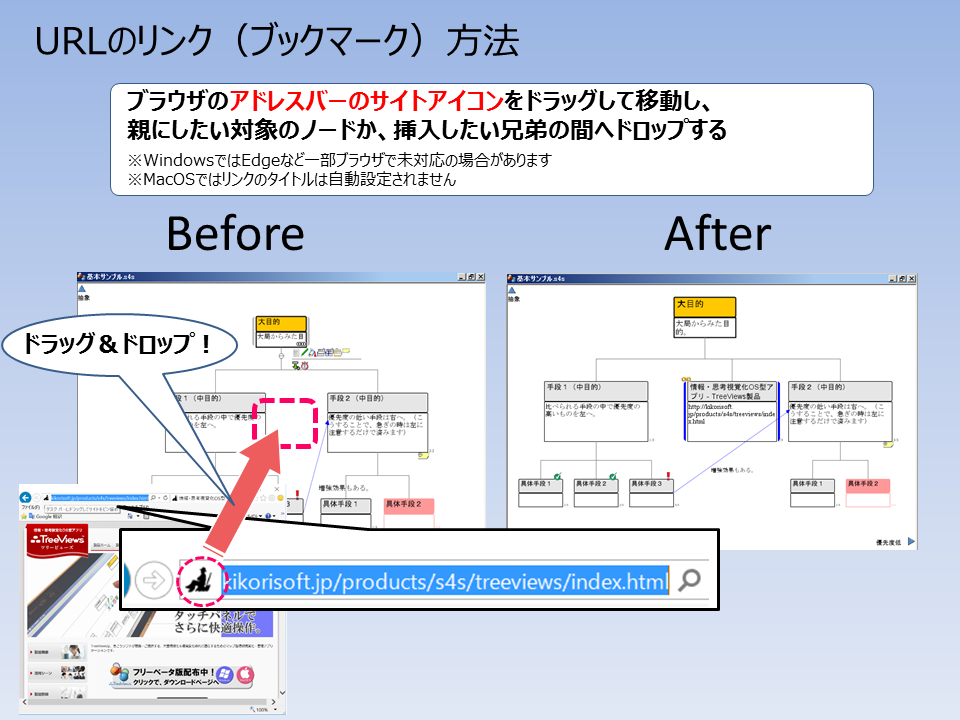
TreeViews has a function to easily bookmark a URL to a map by dragging and dropping (D & D) of browser address icons.
The link procedure is shown below.
However, there are browsers not compatible with D & D such as Microsoft's Edge browser.
Click to enlarge.
For general nodes other than link nodes, double-click on the target node, you can immediately edit the title only.
To complete the input, press the return key or click on a part other than the node you are editing.
If editing of body etc. becomes necessary along the way, you can shift to the dialog mode where you can promptly perform detailed editing by Tab key.
![]()
If you do not need to edit and want to display the details of the node at presentation etc., click the details button of the node edit panel.
Details will be displayed in a separate dialog.
Click on another area to close it, so if you want to keep the display, please check "Keep this visible" in the details dialog.
![]()
To do editing, press the return key on the target node or click the pencil button on the node edit panel.
![]()
You can insert a new parent node between the selected node and the parent node.
To insert it, click the up arrow icon in the node edit panel.
![]()
You can add a new child node to the currently selected node.
To do so, click the down arrow icon in the node edit panel.
![]()
You can delete the node under selection.
Click the trash-can icon in the node edit panel.
![]()
Copy the selected node and its descendants (branch).
Click the copy icon on the node edit panel to copy.
![]()
Paste the previously copied branch to the currently selected node.
To paste, click the clipboard icon on the node edit panel.
![]()
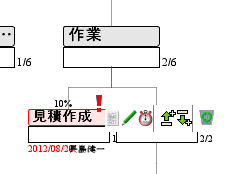
By clicking the stopwatch icon on the node edit panel, you can view and edit the task information of the selected or last selected node.
By using this function, you can manage the details of each team activity and tasks while looking at the map.
It can also be applied to WBS creation. It helps when creating a work list or a line chart in cooperation with the PC version.

Task information, the progress bar on top of the node box (%), done or attention, hold mark, it appears deadline and in charge at the bottom.
*this example of display is in Japanese version
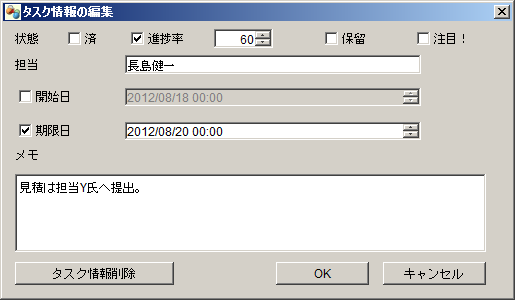
In the browsing / editing task information dialog, you can also set start times and notes that are not displayed on the map.
*this example of display is in Japanese version
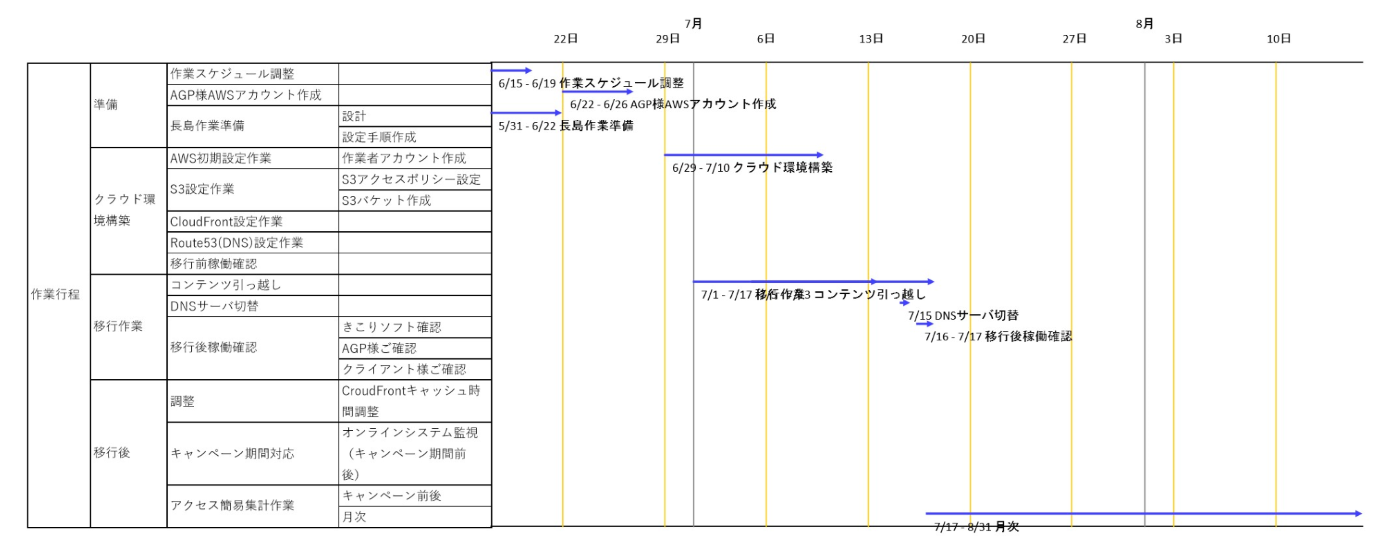
In the paid version, task information contained in the map can be displayed as a schedule (time series table).
You can also export the schedule to the Excel file with the WBS table.
You can display the schedule view by right-clicking on a blank part of the map containing task information and selecting "Show Schedule View" in the context menu.
This function is available during the trial period, so please try it!
*this example of display is in Japanese version
![]()
The sticky note branch function is useful when you want to add information such as memos to the node without displaying it normally.
Click the sticky note icon on the node edit panel to add a sticky note branch to the selected or last selected node.
A node with a sticky note branch has a small sticky note icon at the bottom right of the node.
By clicking the +/- mark on this small icon to switch it, you can toggle display and non-display of descendants from sticky note node.
You can add ordinary nodes freely below this branch.
The opening / closing state of the sticky note branch is retained when the map is saved.
You can hang ordinary branches.
![]()
Folders and files linked to the map of TreeViews can be checked for updates by the monitoring function of the file update checker.
If checking is enabled, the "New!" Icon will be displayed on the node when the link destination file update after the last map save time is detected.
In addition, if the folder is linked, this function can automatically detect the existence and update of files up to 3 layers below and can synchronize with the map.
With these functions, the entities of linked files and folders will not be affected by deleting, updating, etc., so you can use the map with confidence.
![]()
You can set colors such as text, box fill, and lines.
You can click on the color bucket icon in the node edit panel on the target node or right-click and edit it with the "node format (Ctrl-G)" menu selection in the context menu.
If you hold down the Shift key while selecting multiple nodes and do this operation, you can make changes at once.
![]()
Markers (icons) of "Done" and "Attention!" can be set for the selected node.
You can turn on / off the icon from the "Marker" menu on the context menu displayed by right-clicking on the target node,
Or "Done" can be set/unset with Alt + C, "Attention!" can be set/unset with Alt + A.
In addition to the parent-child relationship of nodes, you can link by arbitrary nodes with arrows as follows.
(1) Select the node to start the link, hold down the Shift key and select the end node
(2) Right-click on the blank space of the map not on the node to display the context menu
(3) Select "Create arrow link"
After creation, right-click on the link line, you can change the color of the link, edit the label string, etc. from the context menu.
You can delete only the selected node itself, leaving descendants.
To do thinning, right-click on the target node to display the context menu and select "Thin out".
However, in the case that the target is the root child, you can thin out itself only when there is only one child.
![]()
You can return editing state for editing operation.
(Maximum number of times to undo : Free=2 , Pro=100)
Tap once to restore to the previous edit state for one operation.
Clicking the button of the back arrow at the bottom left of the screen once or pressing Ctrl - Z restores the previous editing state.
By using view switching, you can change the display range below the selected node to a depth suitable for the application, such as looking at the whole or editing it partially.
![]()
When you click the globe icon on the right of the screen of the view operation panel, it will switch to a full screen display mode.
Display all nodes as much as possible.
It is suitable for when you want to grasp the whole thoroughly for individuals.
However, when displaying huge maps on a notebook PC or the like, the drawing processing load may be applied and the scaling reaction may be delayed.
In this case, you can comfortably display by switching to another bird's eye view or myopic view mode (described later).
![]()
By clicking the bird icon on the right view control panel of the screen, you can switch to the bird's eye view display mode.
Each time you click, you can adjust the bird's eye view (Large) and the bird's eye view (Small) and the display range.
This mode displays the node from the selected node to moderate depth (field of view).
It is suitable when discussing within a group that already knows the whole map.
![]()
Click on the glassesman icon on the right view control panel of the screen to switch to myopic view mode.
The range is narrowed down from the selected node to the node immediately below it.
It is suitable for explaining step by step to those who do not yet understand the contents and intentions of the map.
![]()
Click on the S mark icon on the view on the right of the screen to switch between simple display mode and standard mode.
In the simple display mode, the body of the node is not displayed.
Regardless of details, make it easier to capture the structure without giving extra information, such as when viewing overlooking or explaining to others.
![]()
By clicking the icon of the state that the two nodes are connected vertically in the view control panel on the right of the screen, you can change the magnitude (perspective) of the large and small depending on the depth of the node.
Every time you click, it will switch to equal size (no perspective), perspective (strong), perspective (weak).
![]()
You can adjust the currently selected node to the center of the screen by clicking the icon of the view that is drawn at the center of the icon in the view control panel on the right of the screen.
You can use it to redisplay the selected node when you lose sight of the selected node outside the window while moving the map.
![]()
If you click the FIT icon in the view control panel on the right of the screen, the display is adjusted so that the tree below the selected node fits on the screen.
This is convenient when you want to move the selected node during presentation etc. and quickly put the tree in the screen.
![]()
The preview window is a function to display small window of reduced map of the original map view.
Click on the preview window icon on the view right side of the screen to display the preview window.
You can move the map synchronously by dragging the mouse on either sides of the preview window or the original map view.
However, when the perspective view mode is ON, depending on the original map, sometimes the contents of the reduced preview window may be distorted from the original map or the red view-frame do not match because of the internal processing for reducing display processing.
![]()
You can search the titles or bodies of the nodes by keyword and get the result as a list.
Also you can move the focus to that node by clicking on the displayed item.
Click on the binoculars icon at the bottom left of the screen, the search dialog will be displayed.
You can also search for keywords by ANDing with spaces.
To replace the strings at the same time as searching, select the "Replace" radio button.
![]()
Convert TreeViews map to other data format.
You can actually export this guide to your preferred format, so please try it!
Select the branch you want to convert (if the root node is selected, it will be the whole) and click on the icon of the arrow from the TreeViews mark on the left side of the screen to display the export format selection dialog.
Follow the instructions in the dialog for the subsequent operation.
![]()
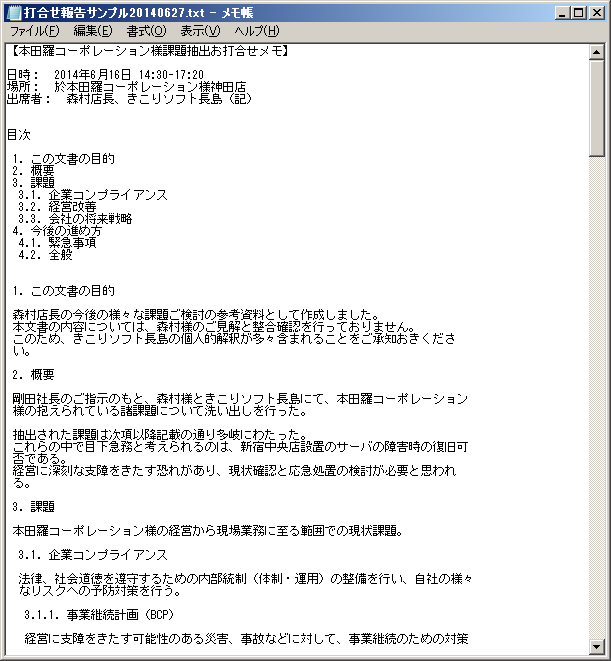
Convert the displayed map to a text file using the built-in text template and output it.
For example, if you take a note on a map at a meeting, you can export it as a beautifully formatted minute note immediately after the meeting and send it to the concerned members.
![]()
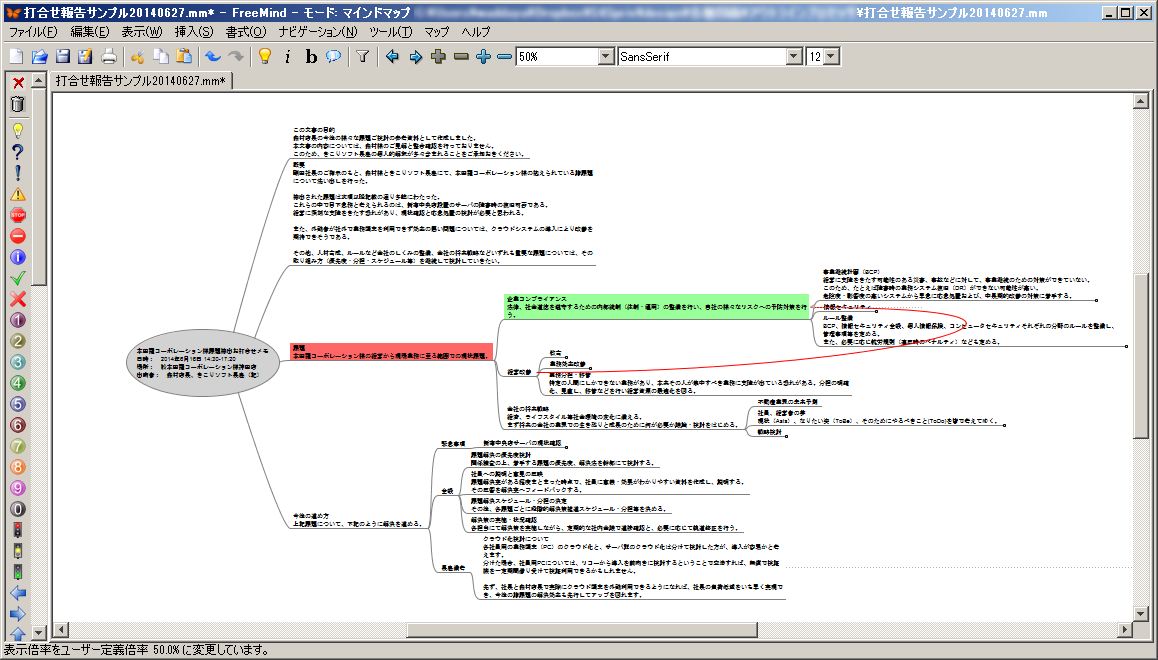
Export as mind map application FreeMind mm format file.
Reference arrow link, node color information, node name, node body text ("note" in FreeMind), order between siblings are preserved.
TreeViews Unique attributes (such as task information) with the contents of the original tvm format are lost.
This function can also be tried within a certain period.
Please try it!

![]()
![]()
![]()

![]()
Select the node of the map you want to see and double click it.
* In the text version guide, only the file name is listed.
samples_en/corporate_strategy_en.tvm
Double click to open the map.
samples_en/webmigration_schedules.tvm
Double click to open the map.
You also can see the schedules view from this map by right-clicking on the blank area of the map.
You can aggregate documents, folders, bookmarks, shortcuts that you deal with at work etc. in the map of this software.
By adding task management information that can handle ToDo and text entry of ordinary nodes together, all the necessary information can be aggregated from the map as a starting point.
The status and information on your work will be able to see everything if you open this map first.
Links can be easily created by dragging and dropping local files, folders, URLs of browser URLs to each node created with this software.
You can open the link easily by selecting the node and choosing "Open link" from the menu or pressing the space key.
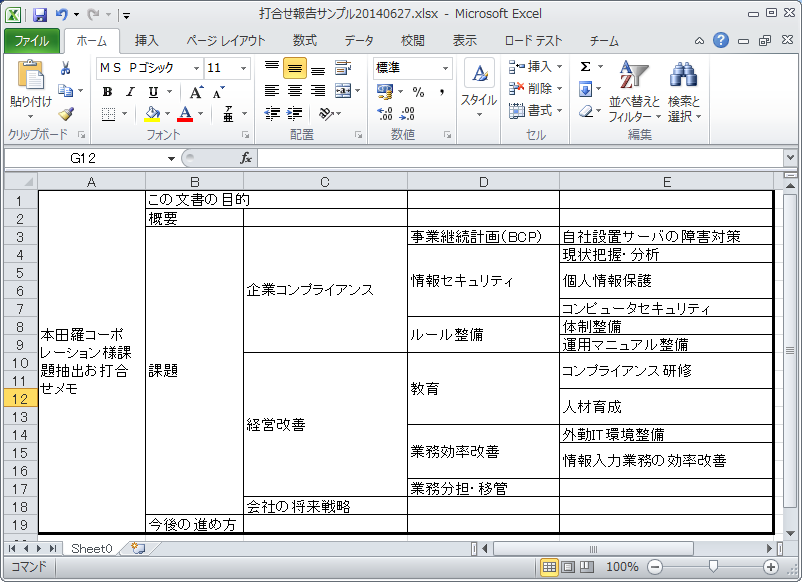
The map created with this software can be converted to various data formats such as text format, HTML, various Microsoft Office formats (paid version), etc. by selecting and exporting the node of your choice.
While watching the map, hold a meeting, leave the results in minutes,
It is also easy to synthesize the maps created separately and to create easy-to-read reports.
Export this map in various formats and experience the effect!

Screenshot is Japanese version.
Screenshot is Japanese version.
Screenshot is Japanese version.
Screenshot is Japanese version.

Screenshot is Japanese version.

Screenshot is Japanese version.
Using the task management function, you can manage the existing node with the name of person in charge, deadline, completed mark, progress rate, etc.
If you get used to it, try to rearrange each task by adding the intermediate purposes and the final purpose.
You can visualize the relationship between the team strategy and the end tasks.
Let's improve the quality of communication and motivation of your team.
Screenshot is Japanese version.
Screenshot is Japanese version.
If you set the entrance of the presentation to the map created with this software, you can explain the structure of what you want to convey in an easy-to-understand manner.
This also makes it possible to smoothly open slides and various reference materials from the items of the agenda in the map.
Once you have finished the detailed explanation , return to the map as the general explanation.
Then it will make the relationship more clearly conveyed for your audience.
If the map view mode is set to "myopic view" , only one level below the currently selected node is displayed , so even complicated maps can be shown as simple.
By utilizing the view switching function, you can use the map created by your usual work as a presentation material immediately.
Create a new map: Ctrl-N
Edit node: Enter
Edit task information: Ctrl-T
Edit external link: Ctrl-E
Add a child node: Insert
Insert parent node: Shift + Insert
Copy of node : Ctrl-C
Paste: Ctrl-V
Delete node : Ctrl-D
Search nodes: Ctrl-F
Print map: Ctrl-P
Save file: Ctrl-S
Open file: Ctrl-O
Mark with "attention!" mark: Alt-A
Mark with "done" mark: Alt-C
Move to the node on the left: <-
Move to the right node: ->
Move to parent node: up arrow↑
Move to child node: down arrow
Zoom in: Page Up
Zoom out: PageDown
Open node details / external links: Space
These are very classical method in the critical thinking( or logical thinking) in business administration but have NOT been recognized or used effectively beacuse it is too much hastle to utilize them in daily management with PAPER.
But now that we can use COMPUTERS for it !
At last they have become common tool by TreeViews and the similar sort of applications that enable people to edit and share and view them easily!!
can describe chains(paths) of purposes and means relations from high strategic layer to low tactical layer.
Y-axis: Importance, X-axis: Priority(in comparable issues = in same layer)
-Task Management function on the node
-Done or yet
-Start/Due date
-Person in charge
-Progress level bar
-Memo
etc.
[Person In Charge] George.W @ HQ
[Due Date] 5 25, 2019
can describe chains(paths) of cause and effect relations.
can describe chains(paths) of "effect and cause" relations from high abstract layer to low concrete layer.
It's suitable for analyzing how fundamental effect consist of various issues(elements as cause) .
Y-axis: Fundamentality , X-axis: Priority(in comparable issues = in same layer)
can describe chains(paths) of cause and effect relations from high abstract layer to low concrete layer.
It's suitable for analyzing what kind of issues(elements) derive from fundamental cause.
Y-axis: Fundamentality , X-axis: Priority(in comparable issues = in same layer)
Y-axis: Fundamentality , X-axis: Priority(in comparable issues = in same layer)
can describe chains(paths) of composition ("has-a") relations from high abstract layer to low concrete layer.
It's suitable for organizing and managing various information and documents(structures).
Y-axis: Granularity , X-axis: Priority(in comparable issues = in same layer)
A. We're sorry, We are keenly preparing materials for logical thinking and using the tree type.
Please wait for a while as we will publish it on a web site etc. as soon as preparation is completed.
For those who can not wait, we recommend the following bestselling books in this field.
Barbara Minto "The Pyramid Principle: Logic in Writing and Thinking (Financial Times Series)"
2008, Financial Times Prentice Hall; 3rd Revised Edition
ISBN-10: 4478490279
ISBN-13: 978-4478490273
For the moment it is sufficient to read the first chapter.
However, even if you understand this, you need a great perseverance to practice this principle with paper.
(Many people surrender before noticing usefulness)
That's why it's worth using TreeViews!
If you read while practicing what is written in the book using TreeViews, understanding will be faster and deeper.
We think that you can definitely understand that logical thinking can be utilized on a daily basis only by eliminating all the annoyance with paper.
A. External file is usually linked with a path which relative to the map file.
The file entity is not included in the map.
Because only the map body is transmitted to another terminal , the links etc. will be broken.
If the relationship of relative path is maintained, you can send it keeping its contents to other folders and terminals by moving / compressing each folder (using another file management application etc.).
A. The entity of the file is not included in the map.
For this reason, even if you link images displayed in the browser, if the browser's cache is cleared or the terminal is restarted, the entity will be gone, so it will not be displayed.
For files of this nature, move it to a folder that is not erased before linking.
A. It does not correspond. Unlike existing mind maps and other applications, TreeViews is designed to be a vertical tree on purpose.
It makes sense to arrange the vertical and horizontal axes so that you can logically analyze and organize things.
Also, free placement is less likely to convey its meaning to other people when explaining things with maps, which leads to confusion of readers and makes it cheaper.
A. Batch change of node title and body color is supported, but it does not correspond to character unit qualification.
That is because heavy use of character decorations may destroy the logical structure of the tree.
Although it is trying to illustrate relationships and importance in the structure, it is not a good idea to bring in another structure inside the node.
Instead of decorating it, we recommend that the node be further structured and expressed.
This is the same reason why TreeViews can not arrange nodes freely.
A. The icon attached to the node is only the "done" mark, the "attention" mark, and the task management related icon.
This is because the heavy use of icons is hard to convey its meaning, and it hinders the sharing of maps and joint use with others.
This is the same reason why TreeViews can not arrange nodes freely.
The paid version is currently in preparation for sale.
As soon as we are ready, we will inform you about new product information websites and new arrivals / notification functions to be installed in upcoming version upgrades.
Until then it is possible to trial the paid version function without interruption by periodically installing it to the latest version.
== Difference from Free version ==
You can also use the following convenient functions!
- Virtual map (Multiple maps can be displayed as one virtual map)
- Comfortable operation in touch panel mode
- Export to Office document
- Task management function (It is possible to create WBS line chart from map to MS Excel)
- Sticky note function that can be hidden as necessary
- Folder / file update monitoring, automatic reflection function
- Reduced map preview window
Currently, it is Japanese only.
We plan to renewal the site along with internationalization of PC version of this product within 2017/1Q.
http://kikorisoft.jp/products/s4s/treeviews/
With Dropbox, you can edit the map file from either the PC or the smartphone to expand the range of use.
You can create a draft of the document or design work in the state of the map while you are out and move and you can document it later on the PC.
https://play.google.com/store/apps/details?id=jp.kikorisoft.android.treeviews.free
https://play.google.com/store/apps/details?id=jp.kikorisoft.android.treeviews.pro